Electronic version of the Instructions for Use ver. 1.0 (2023 / 11 / 30)
Information:
The intended user of the software is a professional user with a high level of competence and professional experience: a medical specialist in dentistry and implantology, with appropriate experience in anatomical analysis and clinical reasoning/diagnostics based on diagnostic medical imaging such as computed tomography, and fluent in English for professional purposes (the software interface is available only in English);
Use of the device requires familiarization with the Instructions for Use supplied by the manufacturer;
A detailed description of the procedure and an explanation of how to interpret the results indicated by the software;
A detailed description of the input files supported by the SIMDENSITY software;
Information that the system user - the doctor - should verify the patient data (update function);
Only examinations performed using the density phantom and of appropriate quality should be uploaded to the SIMDENSITY system;
A detailed description of the file upload process;
Information that Internet access is required to use the SIMDENSITY software;
The minimum input-file resolution specified as voxel size;
Instructions for setting the appropriate field of view - recommended XX - and voxel size (resolution) - recommended 0.125 mm;
Manufacturer contact details and information on how to report software problems;
Information on minimum hardware and software requirements for using the SIMDENSITY system, including:
a. Recommended web browsers; b. Minimum computer technical specifications;
The density phantom has a declared expiry date; after that date it will not be possible to perform an examination in the SIMDENSITY software;
Information on the availability of the IFU in PDF format for registered users;
Explanation of the icons and symbols used in the software;
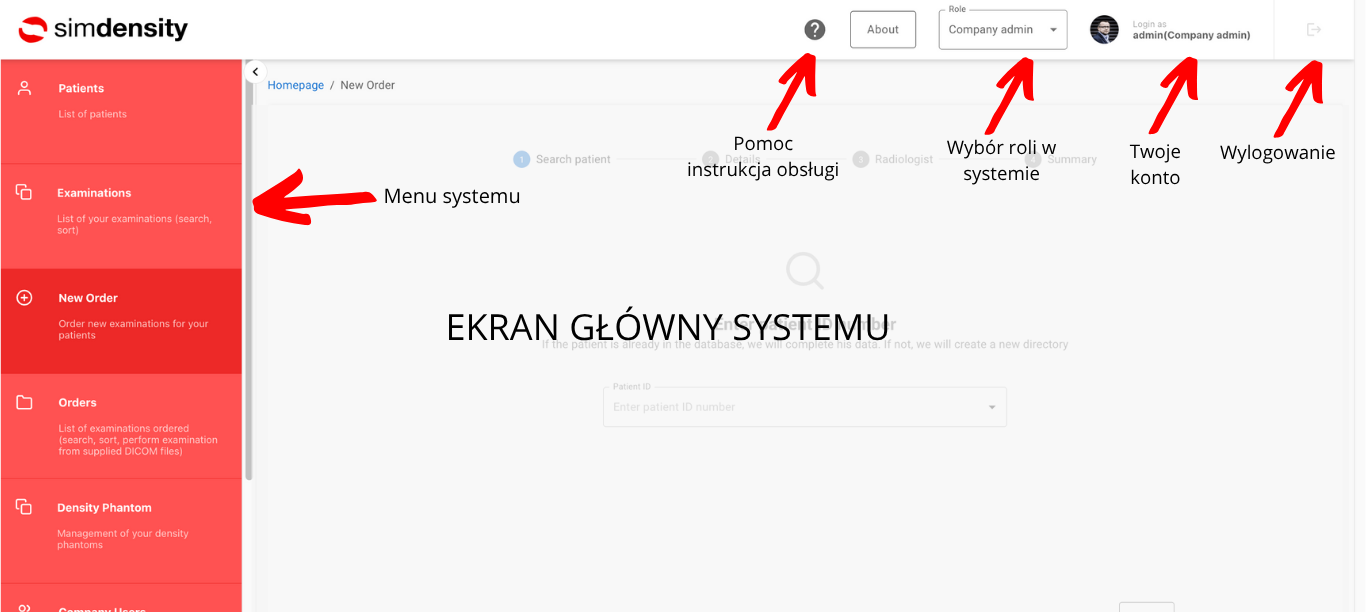
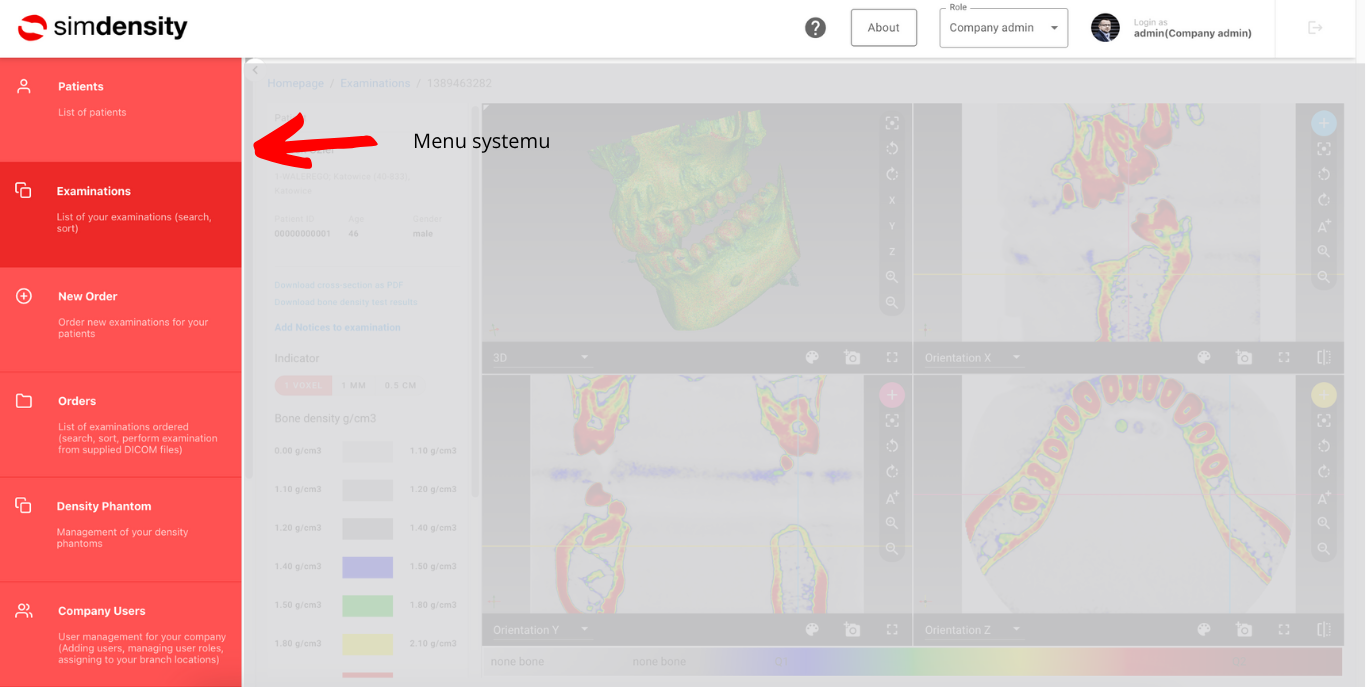
Explanation of the available views (3 planar views and 1 3D view, with 1 to 4 images displayable on the screen), as well as menu placement and collapsible tab icons;
Explanation of when individual user-interface elements, such as messages, appear and disappear;
Information on the correct sequence of actions in the system;
Minimum hardware and system requirements;
Explanation of the color scale used;
Information that, in addition to the color scale, the user screen also displays numerical density values for each color in the system;
Minimum hardware and system requirements;
Information on registration and login using 2FA;
SAFETY
Recommendations / warnings / contraindications / limitations on use of the device
/en/alerts
Recommendations:
The patient examination uploaded to the system should not be more than 6 months old and should be as recent as possible to support appropriate medical reasoning.
Information on the procedure to follow if the Internet connection is lost while uploading DICOM files;
Warnings:
The system stores data for only 30 days - if the data are not saved, they will be lost;
A precise description of the intended purpose of the device and a warning regarding areas of use not investigated by the manufacturer; in particular, conclusions should not be drawn from the software results in the following areas:
a. risk of bone cancer (changes in bone density);
b. orthodontics;
c. orthodontic micro-implants;
Poor DICOM file quality may prevent the software from detecting the density phantom and, consequently, prevent calculations from being performed;
In areas affected by artifacts, the bone-density values indicated by the software may differ from the actual values;
If a web browser other than one specified by the SIMDENSITY manufacturer is used, application functionality may be limited or information may be displayed incorrectly in the application interface;
If a computer with specifications below those indicated by the SIMDENSITY manufacturer is used, the web browser may freeze, the application may run more slowly, and image viewing in the application may be slower or impossible;
Warning that the application may run more slowly if a large number of browser windows are open while using the SIMDENSITY system;
The doctor is responsible for decisions made on the basis of the software indications, the patient's complete diagnostic picture and the doctor's professional knowledge. SIMDENSITY software must be used only in conjunction with other diagnostic tools and an expert clinical assessment performed by a doctor;
Data entered by the doctor are not verified by the software, in particular the content entered in the "examination comment" field.
INCIDENT
Reporting serious incidents
/en/incident
Reporting serious incidents
Any serious incident related to SIMDENSITY software must be reported to the manufacturer at contact@simdensity.com and to the competent authority of the Member State in which the user and/or patient is established or resides.
Serious incident - means an incident that directly or indirectly led, might have led or might lead to any of the following:
a) death of a patient, user or other person; b) temporary or permanent serious deterioration in the state of health of a patient, user or other person; c) a serious public health threat.
Incident
Means any malfunction or deterioration in the characteristics or performance, including use error due to ergonomic features, of a device made available on the market, as well as any inadequacy in the information supplied by the manufacturer and any undesirable side-effect.
1.4
Minimum hardware requirements
/en/minspec
Supported operating systems
Minimum version:
Windows 10, Windows 11 or later
Mac OS X 10.15.x or later
Recommended minimum hardware requirements
Screen resolution:
Recommended minimum resolution:
1440 × 900 or higher
Hardware, minimum requirements:
Processor: Intel® Core™ M
RAM: 8 GB
Graphics: Integrated Intel® HD Graphics 515
Internet access: recommended
Download: 60 Mbps/s
Upload: 30 Mbps/s
Files: *.dcm - accepted extension.
Web browsers
Recommended browsers:
Google Chrome
Supported browsers:
Firefox (Mac or Windows)
Safari (Mac)
EDGE
We recommend using the latest available versions of the browsers listed above.
02
Getting started
2.1
Getting started
/en/Pierwszekroki
Learn how to register with simdensity.cloud, log in and manage your account.
To register with the SIMDENSITY system, select “Register”
In the next step, select the registration method
First registration
Select the Company Owner / Administrator tile
and click the “NEXT”
Then enter the login details for your SIMDENSITY system account.
Next, enter the details of the company that will handle financial settlements and will be the payer for services.
It is important to provide the correct VAT / TAX number. These details will be verified by the VISUAL TECH-LAB sp. z o.o. team.
If you will only manage the account in the SIMDENSITY system, do not select additional roles: DOCTOR or RADIOLOGIST.
If you are a sole practitioner / single practice and you are a Doctor, select the “DOCTOR”. If you do not do this, you will be able to assign the role after registering your company in the system.
If you are a Doctor and perform CBCT scans in your own practice, select the “DOCTOR” tile and the “RADIOLOGIST"
In the next step, select the two-factor verification method used during login.
by e-mail - the 2FA code will be sent to the e-mail address provided during registration
by SMS - the 2FA code will be sent by SMS to the phone number provided during registration
By clicking the button
At this stage you can also add branches / locations of your company, which you will then be able to manage.
NOTE:
Branches that do not have their own tax identification are not separate business entities and will be settled through the main account in the simdensoty.cloud system.
If your company has branches that have separate tax identification and therefore constitute separate business entities, they must create separate Company Owner / Administrator accounts for settlement purposes.
2.3
Doctor / Radiologist registration
/en/Pierwszekroki/registerdoctor
¶ Doctor / Radiologist registration in the SIMDENSITY system
Registration of a Doctor / Radiologist who is not an administrator (Company Owner) is performed on the basis of a registration invitation sent by the Company / Clinic / Practice administrator.
A registration invitation for the SIMDENSITY system is sent to the e-mail address specified by the Company Owner.
To register, click the link provided in the e-mail or copy it and paste it into the browser address bar.
You will be redirected to a page where you will be asked to enter your login details.
The invitation code will be entered automatically when you open this page by clicking the link in the e-mail.
Then create your individual Login name: and a password for your SIMDENSITY account.
Then select the appropriate tile to define your role in the system if the role has not already been assigned by your company administrator.
Next, enter your personal information.
In the next step, select the two-factor verification method used during login.
by e-mail - the 2FA code will be sent to the e-mail address provided by the administrator during registration
by SMS - the 2FA code will be sent by SMS to the phone number provided during registration
Then click the button
Information that the registration form has been completed will be sent to your company administrator, who will approve your request. You will be notified by e-mail.
2.4
Login
/en/Pierwszekroki/logowanie
Enter the login name and password that you used during registration.
Select the checkbox accepting the terms of use - I accept the terms of use
Click “LOGIN"
The next step is to enter the two-factor authentication (2FA) security code:
if you selected SMS for two-factor authentication in your profile, enter the code received on your phone.
if you selected e-mail for two-factor authentication in your profile, enter the code received at your e-mail address.
To verify the registration details and make changes, click “Login as” in the upper-right corner of the screen.
Your account details will be displayed:
here you can change your password and the two-factor verification method (e-mail or SMS) Information about the branch or branches to which you are assigned The roles you have in the system Your details and your company details.
All changes are confirmed with the “SAVE” button in the lower-right corner of the screen.
2.7
Density Phantom
/en/Pierwszekroki/phantom
Density Phantom
The phantom is made of a composite material representing ranges of bone tissue with different densities. The reference materials identify three different density levels, from which the System calculates a calibration curve. Based on the CBCT image, the System then calculates the density of the patient's bone tissue at the planned procedure site in the maxilla or mandible.
Determining reference density
The precise calibration of the density reference materials is performed at high resolution using a micro-computed tomography scanner.
Each calibrated Density Phantom receives an individual ID code, which identifies it in the System.
The user verifies the ID code of the received phantom in the system, allowing the system to verify the data using the individual density phantom.
Ordering a phantom
When registering an Administrator / Company Owner, an address associated with the company VAT details is provided. VISUAL TECH-LAB sp. z o.o. verifies the information submitted during registration and confirms the shipping address for the phantom, or phantoms if the Company has a network of practices with their own CBCT scanners, by e-mail or by contacting the registrant directly by phone.
The phantom is shipped by courier to the agreed and specified address.
Instructions for using the Visual Tech-Lab Density Phantom.
Introduction
The polymer density phantom is a flat polymer plate (Fig. 1) and is supplied together with a standard bite-block model shown in Fig. 2.
Fig. 1
Although examinations using a density phantom have not previously been used in diagnostic examinations with dental CBCT (Cone Beam Computed Tomography), the method is known and commonly used in radiological diagnostics in tomographic examinations using clinical QCT (Quantitative Computed Tomography). The solution used is equivalent; only the density phantom has been miniaturized because the useful radiation field in a CBCT device is significantly smaller than the radiation field in a QCT device. The density phantom is supplied with a bite block. The phantom should be attached by sliding it into the socket/opening at the end of the bite block. The phantom has a thickened section that limits its position after insertion into the bite block.
Identification of the Density Phantom in the Simdensity system
The Density Phantom has defined individual parameters for the built-in density reference materials, which are visualized in the tomographic image during a CBCT examination and then stored in DICOM files. The parameters of each phantom are assigned in the Simdensity system database, and it is identified by entering the unique individual ID number permanently marked on its surface.
Using the Density Phantom
I. Preparation of the phantom with the bite block.
After each examination performed using the phantom and bite block, they should be subjected to chemical disinfection. Chemical disinfection of the phantom and bite block should be carried out after removing the phantom from the bite block, in accordance with the instructions of the manufacturers of the disinfectants used in the medical practice. Thermal (high-temperature) disinfection is excluded because it may deform the geometry of the phantom.
Fig. 2
After disinfection, remove chemical residues with water and dry the phantom and bite block.
To perform an examination, place the phantom in the opening of the bite block.
Fig. 3. Placement of the density phantom in the bite block.
Place the assembly (phantom attached to the bite block) in a disposable polyethylene protective bag used in the medical practice, e.g. RVG type 40 mm/200 mm. Fig. 4
Fig. 4
II. Placement of the phantom in the patient's oral cavity and examination procedure.
Disposable gloves must be worn when inserting the phantom with the bite block into the oral cavity. Insert the prepared phantom with the bite block into the oral cavity so that the phantom is positioned centrally, just behind the dental arch, perpendicular to the occlusal plane (Fig. 5).
Fig. 5
If the examination must be performed in occlusion, the bite block may be omitted and the phantom alone may be placed in a disposable protective bag, e.g. RVG type 40 mm/200 mm. In this case, the patient bites the bag and stabilizes the phantom with the tongue during the examination, pressing it against the dental arch. The patient should be instructed, as far as possible and by feel, to stabilize the phantom vertically, perpendicular to the occlusal plane and centrally. Gently tensioning the disposable protective bag before biting helps stabilize the phantom during the examination.
Position the patient standing or seated in accordance with the recommendations of the CBCT device manufacturer. The hands should be placed on the handles, with the shoulders and elbows relaxed.
During the examination, the head should be positioned in the Neutral Head Position (NHP), understood as positioning the occlusal plane parallel to the floor. When using the phantom with or without the bite block, it is recommended to support the head on a chin or subnasal support and additionally stabilize the head at the temples. Protect all supports with disposable protective covers recommended by the CBCT device manufacturer. In the standing position, the patient should keep the feet together, legs straight, and the body slightly tilted backwards.
Instruct the patient to remain still, not to swallow saliva, to breathe shallowly or - for a short examination - to hold their breath, and not to move the tongue. The patient must remain under constant visual supervision through the monitoring system, a window or viewing port throughout the examination.
Using disposable gloves, remove the phantom from the oral cavity.
Send the phantom and bite block for disinfection and dispose of the single-use protective bag in a medical-waste container.
End of procedure.
Information:
Manufacturer contact details and information on reporting problems with the phantom;
If the phantom cracks, the manufacturer will replace it with a new phantom;
Recommendations:
A protective bag enclosing both the phantom and the bite block must be used during the tomographic examination;
Information on the recommended process for disinfecting the phantom before use with the next patient;
2.8
Selecting and changing a role
/en/Pierwszekroki/choicerole
After logging in to the SIMDENSITY system at simdensity.cloud, if you have multiple assigned roles, click the “Role” drop-down list in the upper-right corner and select the required role to change roles.
After a role is selected, the system adjusts the left-hand menu to show the functions assigned to that role.
It is best to enter the PESEL number or National ID as the Patient ID. If this is not possible for any reason, assign your own 11-digit patient number.
The Patient ID is the value that will be verified when the patient is referred to another radiology diagnostic facility outside your organization or to an internal radiology diagnostic facility.
Search for or select a specific patient from the list.
Then click the icon at the end of the patient's basic-data row.
For each patient, the examination history is available, together with the option to view and repeat an examination using the DICOM files added to that examination.
4.5
Examinations
/en/funkcje/badania
Examinations - this tab contains ordered examinations, with sorting and search options.
To search for an examination, enter the examination number or Patient ID.
The examination list contains the following information (with sorting available):
Analysis date
Examination number
Patient name
Name of the doctor who ordered the examination
Examination expiry date
Link to view the active examination
On this tab (upper-right corner) there is a list of your examinations divided into:
Only examinations ordered by you
Examinations available from other workstations at the assigned location
All examinations from the entire company
05
DICOM data
5.1
Preparing DICOM files
/en/howdicom
Recommended CBCT scanner settings for bone-density examinations.
minimum parameters:
voxel size 0.125 x 0.125 x 0.125 mm; it is important that the voxel have equal dimensions in all three directions)
0.8 x 0.8 x 0.8 may not be processed correctly
Required CBCT file export settings
Export the data as uncompressed DICOM (each slice in a separate file) in an axial slice arrangement (sometimes referred to as axial or transverse), i.e. slices transverse to the patient's long axis.
Files in *.dcm format
06
Orders - Doctor
6.1
Ordering an examination / New Order
/en/funkcje/zlecenie
To order a new examination, select a patient from the list or enter the assigned Patient ID number.
After selecting the patient
Click the button NEXT
Confirm / verify the patient data.
Click the button NEXT
Next, define the source of the DICOM files. You can select *.dcm file resources from a folder available to you, refer the patient for a tomographic examination at a radiology service provider known to you, refer the patient to a radiology facility that is part of your organization, or refer the patient to any radiology facility selected by the patient.
NOTE:
For any location outside your practice or practice network, the patient must be informed that the radiology facility is required to have an account in the SIMDENSITY system. DICOM images acquired without a density phantom authorized in the simdensity.cloud system cannot be used for bone-density analysis.
select: I have a DICOM file with a density phantom, go to upload and analyze if you have access to the CBCT examination results as *dcm files go here
select: I don't have a DICOM file, send this patient to a radiologist if you do not have access to the DICOM files go here
6.2
I have direct access to the DICOM file repository
/en/funkcje/zlecenie/igotdicom
I have direct access to the DICOM file repository
If you acquired the radiological images yourself and/or have access to DICOM file resources, select:
“I have a DICOM file with a density phantom, go to upload and analyze” I have a DICOM file with a density phantom, go to upload and analyze
Continue by clicking the button NEXT
An order-summary screen will appear containing the patient details and the doctor / radiologist details.
Click DONE
Patient authorization: if the data are correct, continue by clicking NEXT
Select the density phantom. The unique density-phantom number can be found on the phantom packaging.
Enter the phantom number in the field Phantom ID
Continue by clicking the button NEXT
Next, select the location of the DICOM files in your local or network resource by clicking SELECT DICOM FILES
After selecting the data source and confirming “Send” / “Add” the system will display a control count / the number of files in the folder.
After clicking the button NEXT, the system will start uploading the files. The system uploads the files in batches of up to 50 and also displays the number of files uploaded and the number remaining.
After the DICOM (*.dcm) files have been uploaded, the system will confirm that the data were added successfully.
It will also display a summary and verify consistency between the DICOM metadata and the data stored in the SIMDENSITY system.
If the data need to be corrected, click the “UPDATE” button, which allows the patient data to be corrected at this stage by specifying the data source.
The data can be corrected using information from the DICOM file by clicking “USE VALUE FROM FILES"
Confirm by clicking SAVE.
A note can be added in the field below.
Continue to the next step by clicking the button. NEXT
You will proceed to a summary of the collected information. If it is correct, click the button SEND TO DOCTOR
The system will automatically take you to the EXAMINATIONS (ORDERS) tab. Select the patient and click “Make Examinations"
Clicking Make Examination will open the examination-area selection screen.
Select:
maxilla
mandible
maxilla and mandible
Select the required examination area by clicking it so that the selection color changes to red. To cancel or change the examination area, click the selected area so that its color changes to gray.
After selecting the examination area, click ANALYZE NOW at the bottom of the screen.
The system starts the examination.
When the process is complete, information about the examination result will appear (types and descriptions of results are provided in the Examination Results section). If the examination result can be presented, click SHOW RESULTS
6.3
I do not have a DICOM file - send the patient to a radiologist
/en/funkcje/zlecenie/donthavedicom
If you do not have direct access to DICOM file resources, you can refer the patient for a CBCT examination using one of the following options:
Referring a patient for an examination to an external radiology facility
/en/funkcje/zlecenie/outsidecooperation
Referring a patient for an examination to an external radiology facility cooperating with your practice.
To refer a patient to a radiology facility cooperating with your practice, click the radio button labeled: Select radiologist and send SMS
Then select the radiology facility to which you are referring the patient from the drop-down list or on the map and click the “NEXT”
In the next step, the simdensity.cloud system generates an order summary that can be sent to the patient by SMS (the patient's phone number is provided in the patient registry in the system), or printed to a PDF file and sent to the patient at the e-mail address specified by the patient, or printed on a printer and handed to the patient.
The order card contains:
patient details (first name, last name, address)
Patient ID
age
sex
radiologist identification
examination order number
PIN CODE
patient phone number
6.5
CBCT examination at your own practice
/en/funkcje/zlecenie/owncbct
Referring a patient for an examination to a radiology facility located within your organization/company, to your own radiologist.
To refer a patient to a radiology facility located within your organization/company, to your own radiologist, click the radio button labeled: Radiologist in my company
Then select a radiologist from a branch belonging to your company from the drop-down list and click the “NEXT”
In the next step, the SIMDENSITY system generates an order summary that can be sent to the patient by SMS (the patient's phone number is provided in the patient registry in the system), or printed to a PDF file and sent to the patient at the e-mail address specified by the patient, or printed on a printer and handed to the patient.
The order card contains:
patient details (first name, last name, address)
Patient ID
age
sex
radiologist identification
examination order number
PIN CODE
patient phone number
6.6
Referring a patient to a radiology facility of the patient's choice
/en/funkcje/zlecenie/outsidepactient
Referring a patient for an examination to any radiology facility selected by the patient.
To refer a patient to any radiology facility, click the radio button labeled: Send a general link so that the patient can choose the radiologist himself/herself
Then click the “NEXT”
In the next step, the simdensity.cloud system generates an order summary that can be sent to the patient by SMS (the patient's phone number is provided in the patient registry in the system), or printed to a PDF file and sent to the patient at the e-mail address specified by the patient, or printed on a printer and handed to the patient.
The order card contains:
patient details (first name, last name, address)
Patient ID
age
sex
radiologist identification
examination order number
PIN CODE
patient phone number
07
Orders and handling - Radiologist
7.1
Handling a Doctor's order: adding DICOM files and verifying the patient
/en/funkcje/zlecenie/uloaddicom
After logging in with the Radiologist role, the first screen is used to verify a patient referred for an examination.
Using the referral presented by the patient (printout or SMS details), enter:
Patient ID (11 characters)
PIN Code
Click “SEARCH”
The system verifies the entered data. If the data are correct, a summary and data-verification screen is displayed.
If the data correspond to the patient, click the “NEXT”
The next step is to select the correct density phantom that will be used for the CBCT examination.
Continue by clicking the button NEXT
Next, select the location of the DICOM files in your local or network resource by clicking SELECT DICOM FILES
After selecting the data source and confirming “Send” / “Add” the system will display a control count / the number of files in the folder.
After clicking the button NEXT, the system will start uploading the files. The system uploads the files in batches of up to 50 and also displays the number of files uploaded and the number remaining.
After the DICOM (*.dcm) files have been uploaded, the system will confirm that the data were added successfully.
It will also display a summary and verify consistency between the DICOM metadata and the data stored in the SIMDENSITY system.
If the data need to be corrected, click the “UPDATE” button, which allows the patient data to be corrected at this stage by specifying the data source.
The data can be corrected using information from the DICOM file by clicking “USE VALUE FROM FILES"
Confirm by clicking SAVE.
A note can be added in the field below.
Continue to the next step by clicking the button. NEXT
You will proceed to a summary of the collected information. If it is correct, click the button SEND TO DOCTOR
7.2
Reviewing the history and status of DICOM files added to the system
/en/funkcje/zlecenie/uploadstatus
The tab showing the history and status of added DICOM files contains:
Patient first name, last name and Patient ID
DICOM file upload date
Examination order number
Status
Upload - OK - the files were added successfully
Upload cancelled - DICOM file upload was interrupted
Uploading (X.XX%) - the DICOM files were not fully uploaded. X.XX% indicates the percentage uploaded to the system. In this case, the Actions column provides the following options:
Continue upload - continue uploading files from where the upload stopped
Cancel - cancel the DICOM file upload
7.3
Managing density phantoms
/en/funkcje/zlecenie/phantomradilog
The Radiologist can view the density phantoms in use and add new ones.
Adding a new phantom.
The phantom is delivered by post or courier.
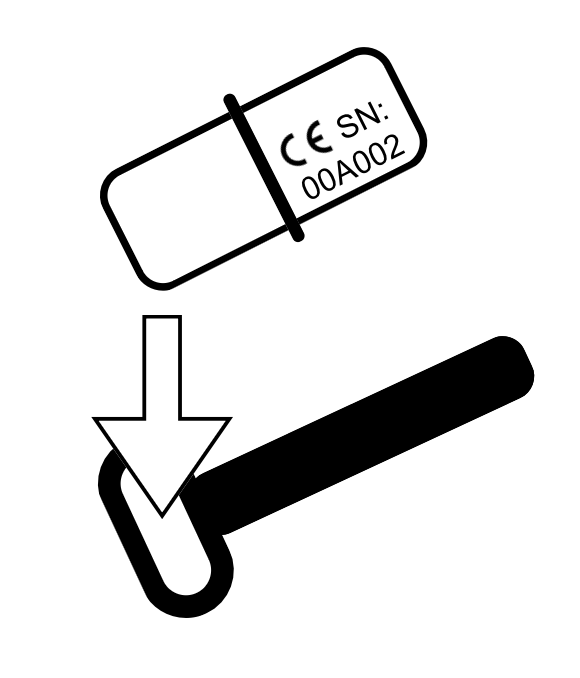
The packaging shows the phantom batch number and the phantom number within the batch, e.g. SN: 00A001. The same marking is placed directly on the density phantom.
The packaging also contains the Density Phantom ID, which enables the phantom to be identified in the system and its assignment to the owner to be verified.
To add a new density phantom, click the “+ REGISTER NEW PHANTOM”
Enter the number from the packaging in the Phantom ID field, assign your own name, and click the “ADD”
If the data are correct, the system will add the density phantom to your account.
08
System administration and operation
8.1
Ordered examinations / Orders
/en/funkcje/doneexam
The Ordered Examinations screen displays information about ordered examinations.
To search for an examination, enter the examination number or Patient ID.
The examination list contains the following information (with sorting available):
Order number
Examination order date
Patient name
Examination status
loaded - DICOM files have been added to the system
waiting - awaiting completion
Actions available for a given examination
Make Examinations - perform the bone-density examination analysis
Upload files - add DICOM files
Print | Resend SMS - resend the SMS to the patient or Radiologist, depending on the referral method selected when creating the new examination. Print the referral for the patient or radiologist.
On this tab (upper-right corner) there is a list of your examinations divided into:
Only examinations ordered by you
Examinations available from other workstations at the assigned location
assign professional activity within branches / locations
add new users
search for users
sort by:
System role
User name
User login
assigned branch / location
Role management
In the selected user row, click “Manage user”
In the “Role in the system” section, click the role that you want to assign to the user; the tile will turn red. To remove a role, click the corresponding role tile; it will turn white.
Then confirm the change by clicking “+SAVE” in the lower-right corner of the screen.
Assigning a user to one or more branches / locations
To add the edited user to a branch / location of your company, select the branch / location from the “Company branch” drop-down list and click “+ ADD BRANCH”
assign users (Doctor, Radiologist) to selected branches / locations
Managing a branch / location
To add a user to a selected company branch / location, select the user from the “User to Add” drop-down list and then click “+ADD USER”, and then click the button in the lower-right corner “SAVE”
To remove a selected user from the list for a branch / location, click “Remove From Branch”
Adding a new branch / location
To add a new branch, click the “+ ADD BRNACH” button on the main Company Branches tab, then complete the fields below and assign users.
Confirm by clicking “SAVE” at the bottom of the page.
view the balance of funds available for examinations
unit cost of an examination in the selected currency
view and sort the list of payments in the system
transaction date
gross transaction amount
Payment method
Link to payment details
Adding funds
To add funds, click “+ ADD FUNDS”.
Then select the amount by which you want to top up the simdensity.cloud system and select the payment method.
Payment methods
PayPal
Recurring charge to a PayPal account
Fast transfer through the Cashbill system
Standard bank transfer
select this option; the system will allow the bank-transfer details to be sent to an e-mail address.
8.5
Reports
/en/funkcje/raports
Different report types are available for each role.
Each report has one common element:
Defining the date range for the generated report.
To generate a report within the scope available for the role, select the required Report type and define the date range and click “GENERATE AND DOWNLOAD”. The system will create an Excel report file, which the browser will begin downloading automatically.
Doctor
Available report types
My examinations
My examination orders
Costs of completed examinations
Radiologists - examination referrals to radiologists
Patients
Doctor report types
Radiologist
Available report types:
My uploaded DICOM files
Examinations assigned to me
List of Doctors ordering examinations
Radiologist report types
Administrator / Company Owner
Available report types:
Examinations
Examination orders
Examination costs
Administrator report types
An additional report filter for this role determines whether the report concerns the entire company or selected branches / locations.
09
Examination results
9.1
Examination results
/en/wynikibadan
Examination results
9.2
Types of results
/en/wynikibadan/rodzaje
Types of results
The result of the preliminary analysis is an assessment and information about the condition of the DICOM files and whether they can be presented after analysis.
The density phantom was not detected or the DICOM quality is critically low for the current order. Uploading a new DICOM examination is recommended. No examination fee will be charged.
DICOM Quality: Excellent
DICOM Quality: Poor. Rescanning required. The input DICOM file for this examination is of low quality or contains errors, which may result in incorrect presentation of the bone-density assessment output data.
DICOM Quality: Sufficient
DICOM Quality: Good
9.3
Results window description
/en/wynikibadan/opisokna
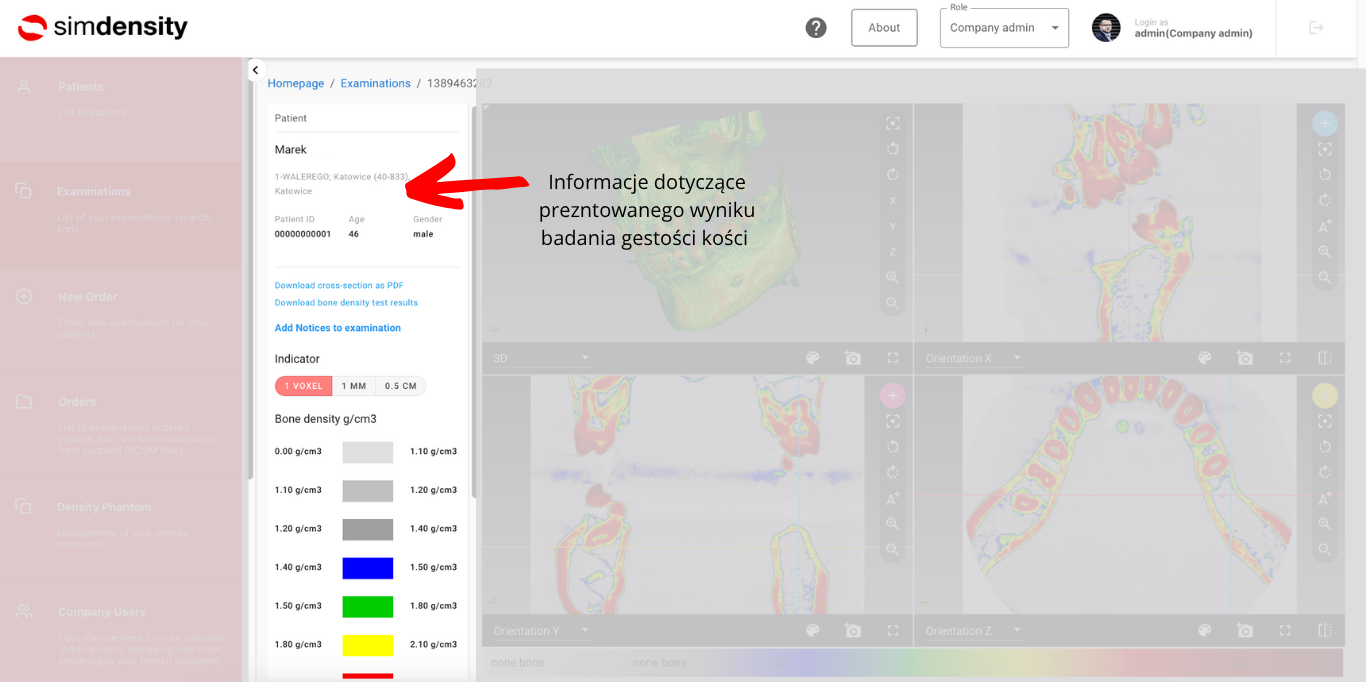
basic patient data - view information about the examined patient
link to download the examination summary - patient card - “Download cross-section as PDF”
option to add a comment
measurement-point size selection
measurement scale and its assigned colors
The scale presents a bone-density range from 0.00 g/cm3 to 3.10 g/cm3, using colors from gray to burgundy. This represents the range from the lowest to the highest density.
9.4
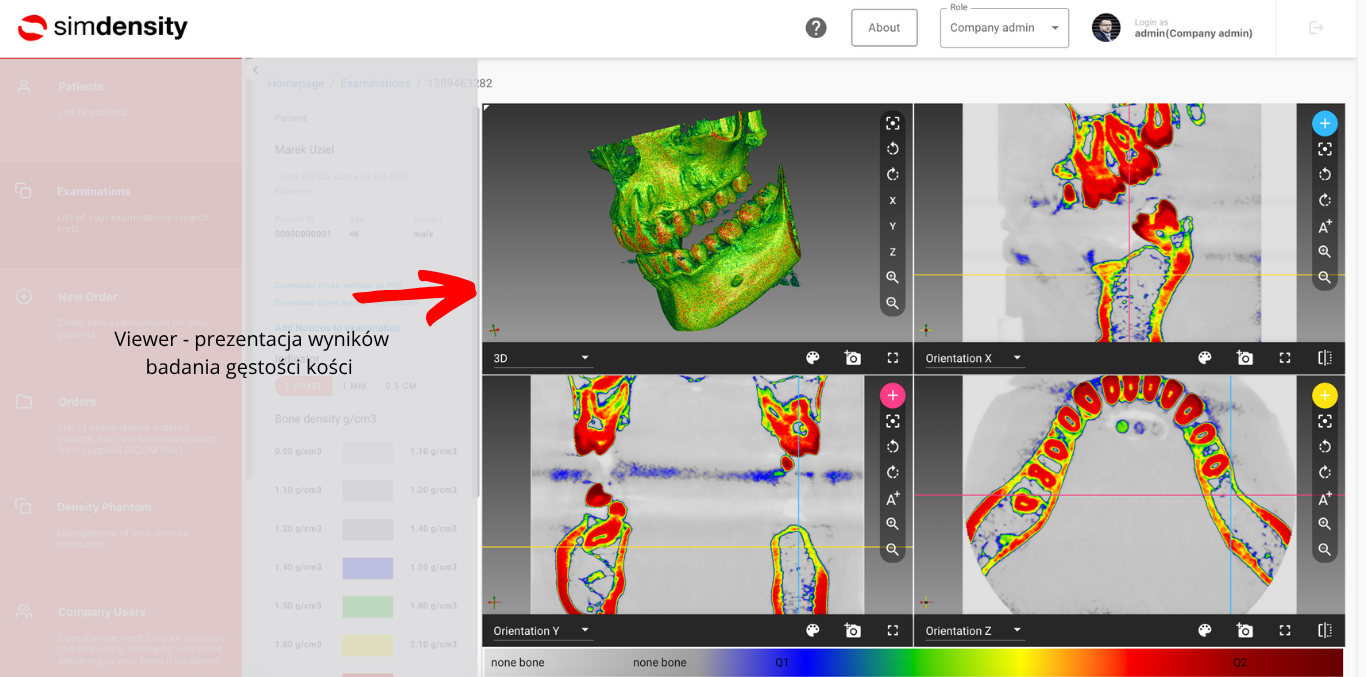
Viewer
/en/wynikibadan/viewer
3D image presentation
layers according to the Y-axis orientation
layers according to the Z-axis orientation
layers according to the X-axis orientation
9.5
Viewer navigation
/en/wynikibadan/viewer/viewuse
To change / move between layers for the selected axis (X, Y, Z), scroll with the mouse wheel or touchpad over the selected axis window.
To pan the image in the selected view window, hold the Ctrl key, right-click and hold the mouse button, then move the mouse.
To rotate the 3D view, hold the left mouse button while moving the mouse in the required direction.
Point measurement of bone-tissue density is performed by clicking the required examination location. The result is provided for the selected measurement size. Depending on the selected measurement range, the value is provided:
for 1 voxel, as the value at the point;
for the remaining options, as the value averaged over the selected area.
The substantive content is based on an export of the public Polish SIMDENSITY wiki. The layout, navigation and presentation layer have been adapted for embedding in WordPress.